
1. How to Add Shortcut to Your Desktop

Once installed TypeItIn on your PC you will need to go to all programs and look for it. Once you have found it open the folder and right click on the icon and then select send to now click on Desktop (create shortcut).
2. Now You Have Got a Shortcut on Your Desktop

Now you can see that I have got a shortcut on my desktop. By default TypeItIn Pro will start up every time your computer starts up and will be on your toolbar by the computer clock and it sits on your desktop too. You can switch this off and I will tell you how in the next step.
3. How to Stop TypeItIn Pro from Starting Up When You Have Just Started Your PC Up (Part One)

Click on your windows Icon found in the bottom left corner of desktop and type in msconfig where it says Start Search and then hit the enter key. If on Windows XP you will need to click on continue and for Windows Vista or Windows 7 you need to click on Allow. For Windows 8 or Windows 10 you will need to do Ctrl + Alt + Delete on your keyboard and then click on Task Manager. Now you will need to click on the tab called Start-up.
4. How to Stop TypeItIn Pro From Starting Up When You Have Just Started Your PC Up (Part Two)

Now you should see a window called System Configuration. Click on the Tab that says Startup and un-tick the box where it says TypeItIn and click on Apply then ok. It will ask you to reboot your pc so do this please. For Winows 8: You just scroll down the list and click on Type It In Pro and then click on the Disable button. You DO NOT have to do steps 3 and 4 if you don't want to. It is that just I do it this way.
5. How to Register TypeItIn Professional

If you have brought yourself a copy of TypeItIn Pro this is how to register the product code. You right click on the TypeItIn Icon found on your Taskbar and then click on Enter Registration. Now type in the details you got in your email and then click on Get Verification. This will open up a browser window just copy and paste the Verification code that you find on the browser window and then click on ok.
6. How to Add a New Group

Where it says Examples all you do a right click and highlight new group then click on it. It will open up a new box and just type in what you want to name it.
7. How to Add a Button (Part One)

Now you can see I named my New Group as New Group. Now right click on where it says example on the button and select new button.
8. How to Add a Button (Part Two)

Now click on where it says new button and a box will open up and click on Save and Close.
9. How to Add a Macro and Short Key

Now right click on the button you have just made and click on edit button now you need to add the short key. Click on the little button found to the right where it says Shortcut keys it looks like a Keyboard. Put a tick to the left of where it says Control and select a letter as well then click on Update key. Now you will need to add a Button Name. For Example: I have put in Jungle Gin No Knocking Rules. Now where it says Text to be typed you need to add the rules that you want and make sure each line has {enter}{Delay 5}{enter} in it. Now click on Save and Close. Please Remember This: Never Use Ctrl+C OR Ctrl+V As These Are Your Shortkeys for Copy and Paste. Also you might have notice that the button doesn´t show all of the title up in the next step I will explain how to widen your buttons.
10. How to Widen Your Buttons


Now this is how to make your button width wider. Right click on the button you want to widen and select Button Width then left click and another window will pop open. Type in 200 and then click on ok. I have made it at the widest a button can go and in step 12 I will be explaining how to change you're font on the button. You will be able to see it all fits now.
11. How to Delete a Button

Now this is how you delete a button. Right click on the button you want to delete and then another window will pop up then you need to click on yes.
12. How to Change the Button Font


Now right click on the button you want to change the font and select Button Font. A new window will open up. Now select the font you want the font to be. For Example: I have chosen Comic Sans Ms, Bold Italic and Size 10. Now click on Apply and then on ok.
13. How to Change the Button Background Colour and Font Colour


Now right click on the button that you want to change and select edit button. A new window will open up. Now you will need to click on the pallet that you can see and this will open up another window. Now click on the down arrow where it says Text Colour and select the text colour you want. Now click on the down arrow where it says Background colour and select the background colour you want. Now click on ok and then click on save and close. Now you will be able to see that your button background and font colour has changed.
14. How to Change Your Button Height
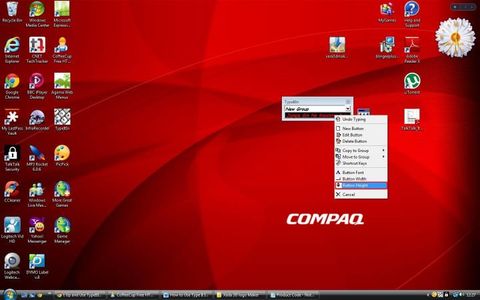
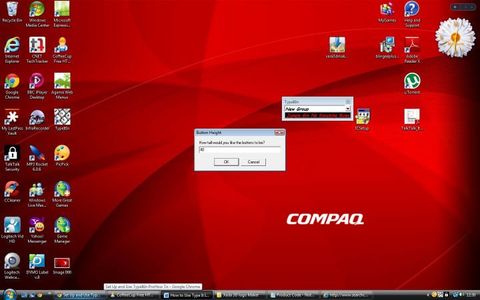
Now right click on the button you want to make higher and select Button Height then click. Now type in 40 and then click on ok.
15. How to Run a TypeItIn Macro
Now when you want to run TypeItIn macro you will need to press For Example: Ctrl+A press together or Ctrl+Shortkey Letter. Also please make sure that your cursor is in the window that you want the macro to run in. Do Not open any other window as it will make TypeItIn run in that window instead.
That is all you need to know about TypeItIn Pro.